One of the best things about DiffuserCam is that it is easy to build your own! We provide a guide on how to build your own lensless camera for 2D photography. We recommend using a Raspberry Pi camera with scotch tape as the diffuser. We will also walk you through the algorithms, step-by-step, in an iPython notebook.
This is a quick-start guide. For more detailed desciptions and links to all resources, check out the full tutorial.
Questions or feedback? We'd also love to hear about any projects that you create using this tutorial! Feel free to contact the authors, Camille Biscarrat (camei *at* berkeley *dot* edu), Shreyas Parthasarathy (shreyas *dot* partha *at* berkeley *dot* edu), Grace Kuo (gkuo *at* berkeley *dot* edu), and Nick Antipa (nick *dot* antipa *at* berkeley *dot* edu).
Quick-Start Guide
This is the quick-start guide to building a DiffuserCam out of tape. A more detailed building guide is provided here.
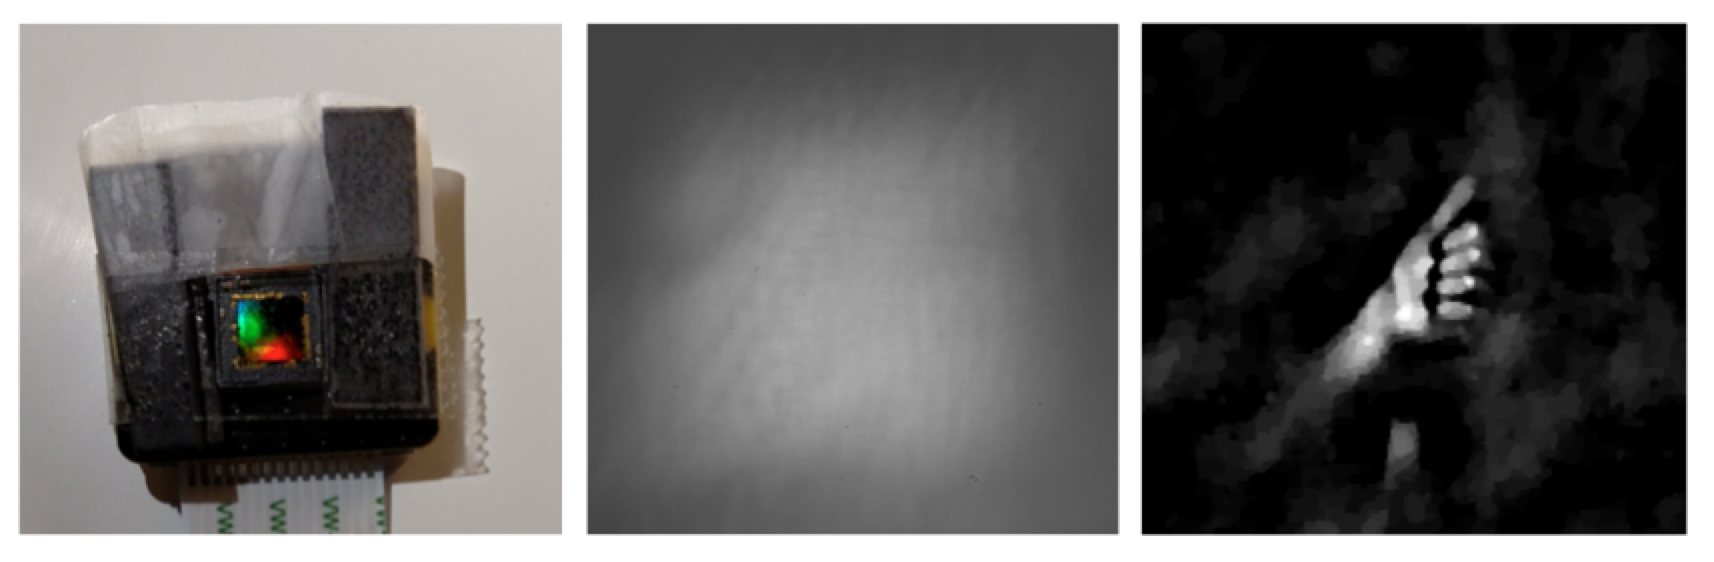
We will build our DiffuserCam to look like this:
Fig 1: Side View of DiffuserCam
Materials List
A Raspberry Pi and PiCamera sensor: If you need help setting the Raspberry Pi up, see the section on PiCamera software at the bottom of this page.
Double sided tape (the diffuser)
Opaque separating material: Blocks stray light and keeps the tape at the right distance (black foamboard, cardboard, paper, etc.).
Black tape: Necessary for creating the opaque aperture and blocking stray light where needed.
Point source: We used a single LED placed behind a pinhole aperture.
Computer equipped with Python 3: Our installation instructions assume you have the Anaconda distribution, but that is not strictly necessary to run the code.
Darkness: For best results, take all the pictures and calibration measurements in as dark an environment as possible (take measurements in a dark room or cover the setup with a box, etc.). Although the room should be dark, the object should be bright and well illuminated.
Instructions: Building your Camera
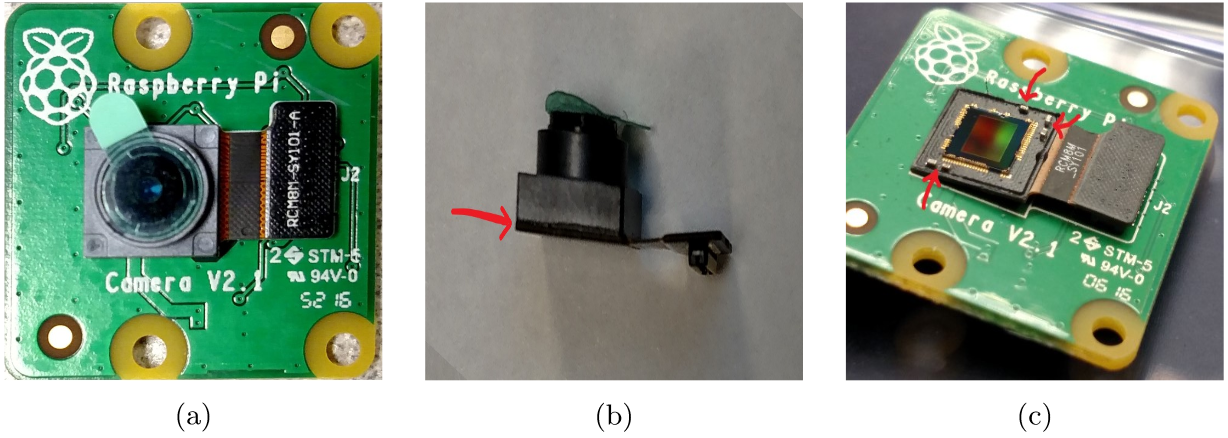
Warning: this step can damage your camera irreparably! Remove the lens from your PiCamera. Cut the glue between the mount and the sensor with a blade (Fig. 2b). When cutting, be careful not to damage any of the electrical components on the edge of the sensor -- see Fig. 2c to determine where delicate components are, and start cutting on the side with fewer components. Be careful also not to touch the gold wires around the sensor--they are extremely fragile.
Fig 2: The Raspberry Pi Camera: (a) PiCamera with the lens, (b) Sideview of the camera, (c) Camera with the mount removed. The arrows indicate electrical compenents to avoid when cutting the glue.
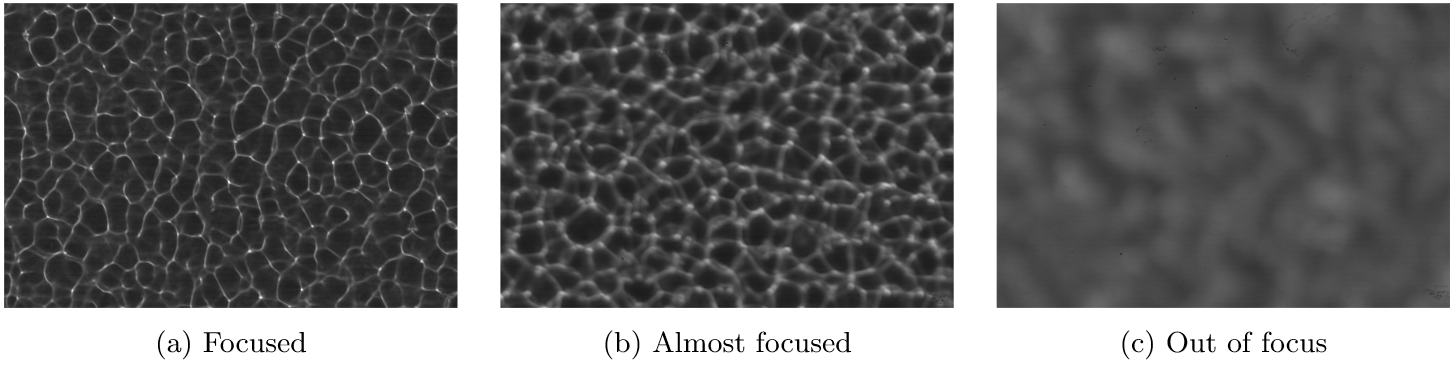
Find the "focal distance" of the tape, the distance at which its PSF has the sharpest features (see Fig. 3 for an example). You should be able to find the distance at which there is a clear caustic pattern by shining a point source through the tape in a dark room and moving the tape closer or farther from the sensor by hand. The point source should be "at infinity" -- around 40 cm is enough for typical focal lengths.
(You may need to setup your Raspberry Pi so you can see a preview of the camera output.)
Fig 3: Sensor reading of a point light source when (a) a diffuser is placed at the right distance, (b) a diffuser is too far from the sensor, (c) a diffuser is very far from the sensor.
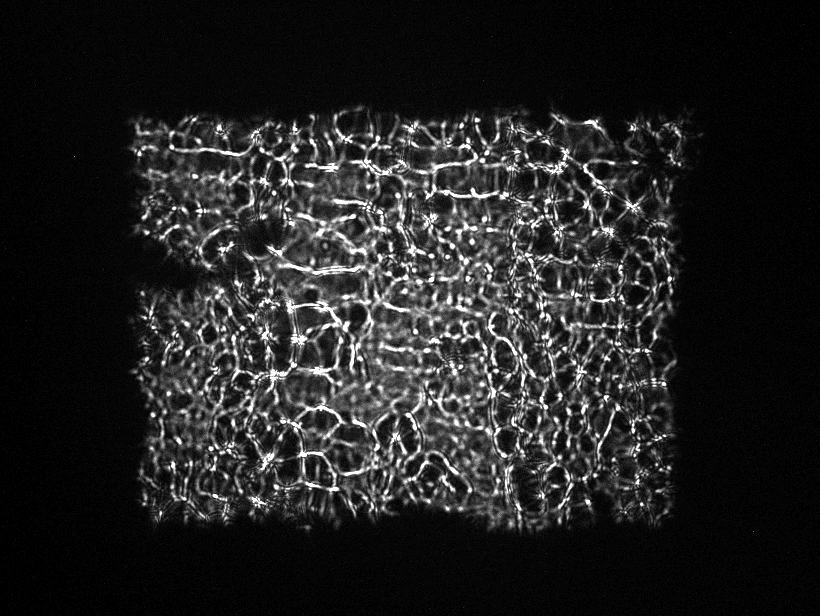
Our double-sided tape had the sharpest caustic when placed around 3mm from the sensor:
Fig 4: Scotch double-sided tape caustic. Your PSF may look different, but the lines should still be sharp.
Place the separating material around the sensor and place the tape on top of it so that it is taut and propped up at the right focal distance. Make sure the separating layer doesn't let in light through the sides.
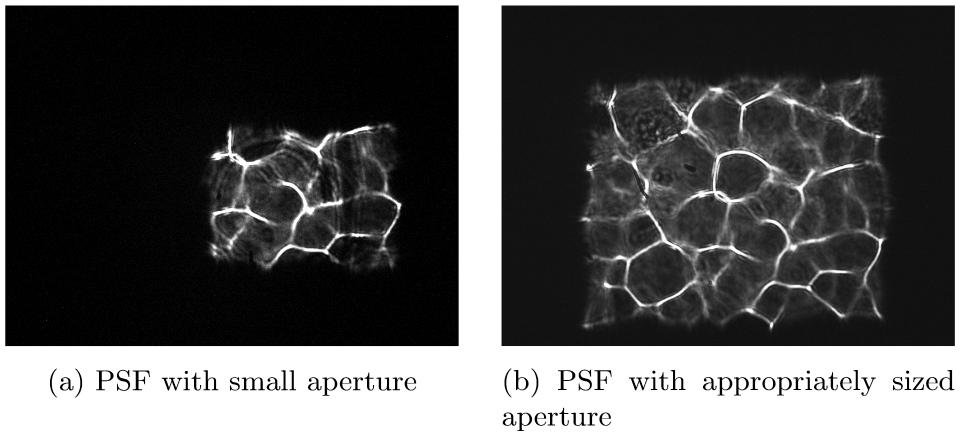
Use the black tape to create an aperture. Make sure the entire cropped PSF is within the sensor field of view by having your camera on while placing the aperture. Make sure the pattern occupies most of the field of view! See below for a comparison.
Figure 5
Take a calibration image (PSF) of a point source. The point source should be as small as possible and as bright as possible without saturating the sensor. We used an LED with a cardboard pinhole aperture in front of it. Adjust the brightness of your light or the exposure time on the camera so that the maximum value is less than 255.
Take an image of your object. If you're using double-sided Scotch tape, the test images provided with our code should be placed around 20cm away when displayed on a typical phone screen. We recommemend using a simple, high contrast image to start, such as the spiral test image. Remember to take images in the dark!
Run the reconstruction algorithm with your point spread function (PSF) and object images as inputs. Instructions for installing and running the code are below.
Instructions: Reconstructing Images
We'll reconstruct our images on a regular computer (not the Raspberry Pi), so you'll need to transfer your images to your computer. Follow the instructions below to install the correct files and process your data
(These instructions assume an Anaconda distribution because it allows for easy installation of dependencies. If you have your own Python3 development setup, feel free to use that instead. The packages you need to install are listed in the environment.yml file.)
Install Anaconda if you do not already have it. Then, open the terminal on your computer and navigate to the directory in which you want to place all the DiffuserCam code. If using Mac of Linux, enter the following commands:
If using windows, use the same commands as above, but replace "source activate diffuser_cam" with "activate diffuser_cam".
Next, open up the gradient descent configuration file gd_config.yml and modify the file pathes to point to your PSF measurement and raw data. (See the FISTA IPython notebook for explanations of the other parameters).
Finally, in your terminal, run python gd.py to reconstruct the images you selected in the config file. If you restart your terminal, you will have to re-activate the diffuser_cam environment before you can run our python files.
Note: Our code assumes images are black-and-white (1 channel, not 3 as in the typical RGB image). The down/upsampling also assumes that the image dimensions are even numbers. If you use our image capture code, both of these requirements should be automatically satisfied.
Instructions: Setting up PiCamera Software
These instructions are for setting up your Raspberry Pi and PiCamera in a convenient way for taking pictures and transferring the images to your computer for processing. If you already have a setup that works, feel free to ignore this section.
Set up the Raspberry Pi operating system (NOOBS is easiest)
When you connect to the pi via VNC Viewer, if the display doesn't fill the entire screen you should go to Preferences → Raspberry Pi Configuration → Set Resolution and set it to a resolution that allows it to fill the VNC Viewer window. Otherwise, when you use our preview code, the terminal might get obscured by the preview.
On the raspberry Pi VNC Server, go to Options → Troubleshooting → Check the Enable experimental direct capture mode box. This lets the picamera preview display correctly on the VNC Viewer.
Install numpy, pillow, and picamera. The raspberry pi is very slow to assemble numpy if you use pip, so we recommend the following (note we're installing the python3 version because all our code is Python 3). To do this, open the terminal and run:
Download the files in our Github repository. Copy the preview.py file, located inside the rpi folder, to your Pi.
If you set up VNC, then you can use the Transfer Files option in the VNC menu at the top of your window, or you can tranfer with a USB flash drive.
Connect the picamera to the appropriate slot in the Pi (it should be labeled "CAMERA") and restart your terminal.
To preview the camera output and capture images, run python3 preview.py in the terminal. Follow the prompts in the terminal to change shutter speed, take the image, and name the image file.
With VNC, you can transfer the image back to your computer using the same file transfer option.